Пистолет для силиконового герметика подобен кисти для герметизации – он прост в использовании, но требует правильной техники для достижения профессиональных результатов. Независимо от того, герметизируете ли вы окна, устраняете протечки в ванной или занимаетесь наружными работами, знание того, как правильно использовать пистолет для силиконового герметика, — это разница между аккуратной, долговечной работой и грязными неудачами.
Это пошаговое руководство научит вас всему: от заряжания пистолета до создания идеально обработанных соединений. Освоив эти методы один раз, вы сможете уверенно справиться с любым проектом по нанесению силиконового герметика.
Как работает пистолет для силиконового герметика.
Воспринимайте пистолет для герметика как высокоточный инструмент, а не просто как устройство для выдавливания герметика из тюбика. Понимание принципа работы помогает добиваться лучших результатов с меньшими усилиями.
Основные компоненты оружия
Ваш пистолет для герметика состоит из нескольких ключевых частей. которые работают вместе, чтобы контролировать поток силикона:
Рамка удерживает патрон и обеспечивает рычаг для сжатия. Спусковой крючок контролирует величину прикладываемого давления. Шток поршня оказывает давление на картридж, чтобы выдавить герметик. Механизм высвобождения Прекращает давление, когда нужно остановить поток. Держатель патрона надежно фиксирует тюбик с силиконовым герметиком.
Качественное оружие отличается плавным спусковым механизмом. и надежный сброс давления – дешевые пистолеты делают качественную работу практически невозможной.
Типы пистолетов для герметика
Ручные пистолеты Требует ручного давления и хорошо подходит для небольших проектов и эпизодического использования.
Пистолеты с батарейным питанием Обеспечивает постоянное давление и снижает усталость рук на крупных объектах – это выгодное вложение, если вы регулярно занимаетесь герметизацией.
Профессиональные пневматические пистолеты Они обеспечивают максимальный контроль и стабильность, но требуют наличия воздушного компрессора.
Для большинства домовладельцев и небольших подрядчиков, Качественный ручной пистолет идеально справляется с задачами по герметизации (90%).
Выбор подходящего силиконового герметика
Качество вашего оружия напрямую зависит от того, что вы в него вкладываете. Для достижения наилучших результатов в разных проектах требуются разные типы силиконовых герметиков.
Понимание типов картриджей
Стандартные картриджи объемом 310 мл Подходит для большинства пистолетов для герметика и подходит для типичных домашних работ.
Большие картриджи объемом 600 мл Требуются мощные орудия, но при выполнении крупных заданий снижается частота перезарядки.
тюбики для сжимания Подходит для мелкого ремонта, но не подходит для оружия – только ручное нанесение.
Всегда проверяйте совместимость картриджей. Перед началом работы осмотрите оружие.
Подбор герметика в зависимости от области применения
Герметизация ванной и кухни Требуются противоплесневые составы, устойчивые к влаге и чистящим средствам.
Внешние строительные работы Необходимы изделия, устойчивые к атмосферным воздействиям, с защитой от УФ-излучения и обладающие гибкостью.
Герметизация душевых и влажных зон Требуются водонепроницаемые свойства и повышенная устойчивость к плесени.
Генеральные строительные работы Использует продукты нейтрального отверждения, совместимые с большинством строительных материалов.
Применение при высоких температурах требуются специальные термостойкие составы.
Необходимые инструменты и подготовка
Наличие необходимых инструментов под рукой обеспечивает бесперебойное выполнение работы. без перерывов и нелепых ошибок.
Необходимые инструменты
- Качественный пистолет для герметика – важнейший инструмент для достижения хороших результатов. Острый универсальный нож для обрезки наконечников картриджей и удаления старого герметика.
- Чистящие средства – обезжиривающее средство, спирт или соответствующие растворители Малярная лента для чистых линий и защиты поверхности
- Инструменты сглаживания – пластиковые скребки или палец Защитные полотна для защиты прилегающих территорий Тряпки или бумажные полотенца для уборки
Профессиональный совет: Смочите инструмент для разглаживания Смочите мыльной водой, чтобы герметик не прилипал.
Подготовка поверхности
Чистые поверхности имеют решающее значение для надлежащего сцепления. – Этот шаг определяет, прослужит ли ваша герметизация месяцами или десятилетиями.
Полностью удалите весь старый герметик. используя острый нож и скребки. Даже мелкие оставшиеся кусочки препятствуют надлежащему склеиванию. нового силиконового герметика.
Очистите с помощью соответствующих растворителей. для удаления мыльного налета, масел и остатков. Изопропиловый спирт хорошо подходит для большинства поверхностей.
Убедитесь, что поверхности полностью сухие. Перед нанесением нового герметика – влага препятствует надлежащему сцеплению.
Проверьте наличие повреждений или износа. Это место нуждается в ремонте перед герметизацией.
Зарядка пистолета для силиконового герметика
Правильная загрузка предотвращает потери и обеспечивает бесперебойную работу. на протяжении всего вашего проекта.
Шаг 1: Подготовка картриджа
Проверьте срок годности. – Старый силиконовый герметик может плохо затвердеть или не прилипнуть должным образом.
Снимите колпачок с картриджа. и любой фольгированный герметик с кончика.
Проверьте наличие расслоившегося материала. При легком встряхивании – небольшое оседание является нормальным явлением, но образование комков или водянистой массы указывает на проблемы.
Найдите конец поршня. – это направлено к задней части оружия.
Шаг 2: Зарядите ружье
Полностью оттяните шток поршня назад. с помощью механизма высвобождения — это создает пространство для картриджа.
Вставьте картридж с наконечником, направленным вперед, и поршневым концом, обращенным назад.
Протолкните шток поршня вперед. до тех пор, пока он не коснется поршня картриджа – вы должны почувствовать плотный контакт.
Аккуратно проверьте спусковой крючок. для обеспечения надлежащего взаимодействия, прежде чем продолжить.
Шаг 3: Отрежьте кончик картриджа
Срез под углом 45 градусов для лучшего контроля и правильной формы сустава.
Начните с небольшого отверстия. – Всегда можно отрезать больше, но меньше отрезать нельзя.
Подберите размер проема в соответствии с шириной шва. – обычно 3-6 мм для большинства применений.
Удалите весь мусор. Перед использованием проверьте отверстие наконечника.
Профессиональный совет: Угол среза влияет на форму бусины. – Более крутые углы создают более широкие и плоские бусины.
Как пользоваться пистолетом для силиконового герметика: пошаговая инструкция по применению.
Для достижения профессиональных результатов выполните следующие шаги. каждый раз, когда вы используете пистолет для герметика.
Шаг 1: Проверьте своё оружие
Слегка нажмите на курок Для начала подачи герметика может потребоваться несколько нажатий на новые картриджи.
Проверьте наличие плавного и равномерного потока. без пузырьков воздуха и резких движений.
Потренируйтесь на картоне или обрезках материала. чтобы почувствовать усилие нажатия на спусковой крючок и движение оружия.
Отрегулируйте хват и стойку. для комфортных и контролируемых движений.
Шаг 2: Наклейте малярную ленту (необязательно, но рекомендуется).
Наклейте малярный скотч. вдоль обеих сторон шва для получения чистых, прямых линий.
Плотно прижмите края ленты чтобы предотвратить просачивание герметика под ним.
Оставьте зазор соответствующей ширины. for your intended joint size.
Don’t leave tape on too long – remove it while the sealant is still wet for best results.
Step 3: Begin Application
Position the gun at one end of the joint you’re sealing.
Держите пистолет под углом 45 градусов. to the joint for optimal bead shape.
Start squeezing the trigger gently while beginning to move the gun.
Maintain steady pressure and movement for consistent bead size.
Keep the tip in contact with the joint without dragging or binding.
Step 4: Control Your Speed and Pressure
Move at a steady pace – too fast creates thin spots, too slow creates thick buildup.
Adjust trigger pressure for consistent bead size throughout the joint.
Don’t stop and start within a continuous joint – this creates weak spots and poor appearance.
If you must stop, release pressure immediately to prevent over-application.
Step 5: Complete the Joint
Finish at the far end of the joint with a quick release of pressure.
Lift the gun away cleanly to avoid dragging sealant.
Check immediately for gaps or thin spots that need additional material.
Work efficiently – most silicone caulk sealant products give you 5-15 minutes to tool the joint.
Professional Tooling Techniques
Tooling creates the final appearance and performance of your sealed joint.
Choosing Your Tooling Method
A wet finger works well for most applications and gives good control.
Plastic smoothing tools provide more consistent results and better hygiene.
Specialized sealant tools offer professional results for demanding applications.
Avoid metal tools that can damage the sealant or substrate surfaces.
Tooling Process
Work quickly but carefully – you typically have 10-15 minutes before the sealant skins over.
Use smooth, continuous strokes for an even appearance and proper shaping.
Apply consistent pressure to create the desired concave profile.
Remove excess material cleanly without disturbing the joint.
Check for voids or imperfections and correct immediately.
Removing Masking Tape
Remove tape while sealant is still wet for clean lines and best appearance.
Pull at a 45-degree angle away from the joint to prevent tearing.
Work carefully to avoid disturbing the fresh sealant.
Touch up any imperfections immediately after tape removal.
Common Problems and Easy Solutions
Even experienced users encounter problems – here’s how to fix them quickly:
Gun Won’t Start Flowing
Check cartridge loading – the plunger rod must contact the cartridge plunger firmly.
Verify tip cutting – the opening may be too small or blocked with debris.
Test trigger mechanism – release and re-engage to ensure proper function.
Check for airlocks – sometimes new cartridges need several pumps to start flowing.
Inconsistent Bead Size
Maintain steady speed – varying movement speed causes uneven application.
Check trigger pressure – consistent pressure produces consistent results.
Verify gun condition – worn or damaged guns don’t maintain steady pressure.
Practice technique – smooth gun movement takes practice to master.
Sealant Won’t Stop Flowing
Use the pressure release immediately when stopping – this prevents continued flow.
Check release mechanism – make sure it’s working properly and fully disengaging.
Turn the gun upward to use gravity to help stop the flow.
Have cleanup materials ready for quick response to drips.
Poor Joint Appearance
Work within the tooling time – sealant that’s started to skin over won’t tool smoothly.
Use proper tooling technique – consistent pressure and smooth strokes.
Remove tape at the right time – too early or too late, both cause problems.
Practice on scrap material before tackling visible joints.
Maintaining Your Sealant Gun
Proper maintenance extends gun life and ensures reliable performance.
After Each Use
Clean the tip area to remove dried sealant that could block future use.
Release pressure completely to prevent stress on internal components.
Store in a clean, dry place away from temperature extremes.
Check for damage or wear that might affect performance.
Cartridge Storage
Seal opened cartridges with appropriate caps or plugs to prevent drying.
Store unopened cartridges in cool, dry conditions within the temperature ranges specified by the manufacturer.
Проверьте сроки годности regularly and rotate stock to use the oldest materials first.
Don’t freeze silicone caulk sealant – this can permanently damage the material.
Gun Cleaning and Lubrication
Clean trigger mechanisms periodically to maintain smooth operation.
Lubricate moving parts according to manufacturer recommendations.
Replace worn components before they affect performance.
Inspect the pressure release regularly to ensure reliable operation.
Safety Considerations
Sealant application involves chemicals and tools that require basic safety precautions.
Personal Protection
Обеспечьте достаточную вентиляцию during application and curing – some products release vapors.
Wear appropriate clothing to protect skin from contact with uncured sealant.
Use eye protection when working overhead or in tight spaces.
Wash your hands thoroughly after handling sealant materials.
Workspace Safety
Protect surrounding areas from sealant drips and spills.
Ensure stable footing, especially when working on ladders or scaffolding.
Keep walkways clear of tools and materials to prevent tripping.
Have cleanup materials readily available for quick response to spills.
Chemical Safety
Read material safety data sheets for specific product information and precautions.
Follow manufacturer recommendations for ventilation and personal protection.
Store materials properly away from heat sources and incompatible materials.
Dispose of waste materials according to local regulations and manufacturer guidelines.
For detailed safety information, consult resources like OSHA guidelines for construction chemicals.
Project-Specific Applications
Different projects require slight variations in technique and approach.
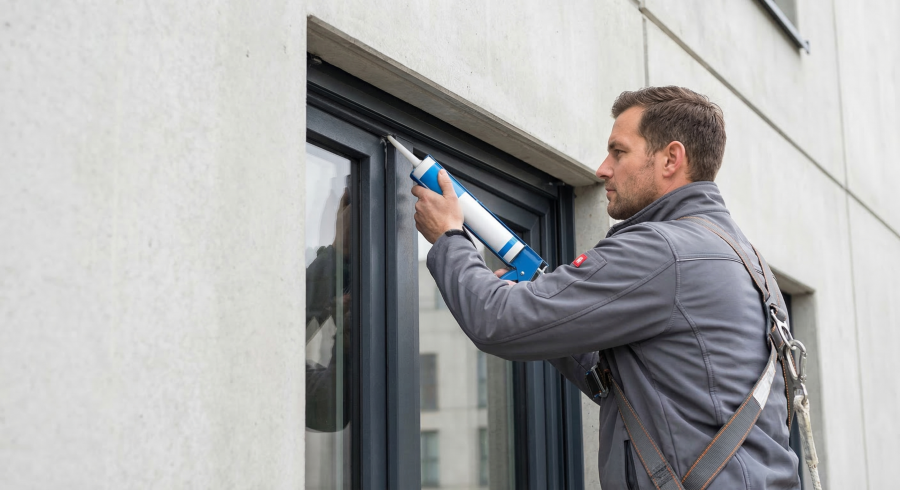
Window and Door Sealing
Work from the outside in to ensure proper water shedding.
Pay special attention to corners where water tends to collect.
Coordinate with weatherstripping to avoid interference.
Consider seasonal movement when designing joint sizes.
For detailed building envelope techniques, see our professional installation guide.
Bathroom and Wet Area Applications
Ensure complete dryness before application – wet surfaces prevent proper adhesion.
Use anti-mold formulations specifically designed for wet environments.
Plan for frequent cleaning by choosing chemical-resistant products.
Allow adequate cure time before exposing to water or cleaning chemicals.
Kitchen Applications
Consider food safety when selecting products for areas near food preparation.
Plan for heavy cleaning with appropriate chemical-resistant formulations.
Coordinate with appliance installation for proper joint sizing and placement.
Address grease resistance in areas exposed to cooking activities.
Outdoor Projects
Monitor weather conditions carefully – temperature and humidity affect application and curing.
Use UV-resistant products for any sun exposure.
Plan for thermal movement in joints exposed to temperature cycling.
Consider seasonal timing for optimal application conditions.
For comprehensive outdoor sealing guidance, see our weather resistance analysis.
Troubleshooting Advanced Problems
When basic techniques don’t solve the problem, try these advanced solutions:
Adhesion Problems
Test surface compatibility with a small sample before full application.
Consider a primer for difficult substrates or critical applications.
Verify surface preparation – contamination is the most common cause of adhesion failure.
Check environmental conditions – extreme temperatures or humidity can affect bonding.
Curing Issues
Verify shelf life – expired products may not cure properly.
Check thickness – very thick applications cure more slowly.
Ensure proper ventilation – some products need air circulation to cure correctly.
Monitor temperature – extreme cold or heat can prevent proper curing.
Performance Problems
Match product to application – using the wrong type of sealant causes most performance issues.
Consider environmental factors – UV exposure, chemicals, and movement all affect performance.
Evaluate joint design – poor design causes stress that leads to failure.
Review installation quality – proper surface prep and application technique are critical.
Professional Tips for Better Results
These field-tested techniques separate amateur from professional results:
Before Starting
Plan your work sequence to minimize setup and cleanup time.
Have all tools and materials ready before opening the first cartridge.
Practice on hidden areas to perfect your technique before working on visible joints.
Check weather conditions for outdoor applications.
During Application
Работа по секциям you can complete and tools within the working time.
Maintain a consistent gun angle for uniform bead appearance.
Keep spare cartridges handy for large projects to avoid delays.
Clean up mistakes immediately before they cure and become permanent.
Quality Control
Inspect your work continuously for gaps, thin spots, or adhesion problems.
Test joints gently after initial cure to verify proper bonding.
Document your work with photos for future reference and warranty protection.
Follow up after curing to address any settling or shrinkage.
Industry Standards and Best Practices
Professional sealant application follows established standards for quality and safety.
Relevant Standards
ASTM C920 – Standard Specification for Elastomeric Joint Sealants provides performance requirements for construction sealants.
ASTM C1193 – Guide for Use of Joint Sealants offers installation guidance for various applications.
Building codes and industry guidelines provide specific requirements for different building types and applications.
Обеспечение качества
Follow manufacturer instructions exactly for best results and warranty compliance.
Use appropriate products for each specific application and environment.
Document installation conditions, including temperature, humidity, and surface preparation.
Maintain quality control throughout the project to ensure consistent results.
Часто задаваемые вопросы
How do I know what size tip to cut on my silicone caulk sealant cartridge?
Start small and cut more if needed – you can’t make the opening smaller once cut. For most applications, a 3-4mm opening works well. Match the opening to your joint width – typically, about half the joint width gives good control. The 45-degree angle is more important than the exact size for creating a proper bead shape.
Why does my sealant gun keep dripping after I stop squeezing?
This usually means the pressure release isn’t working properly. Make sure you’re fully releasing the trigger and engaging the pressure release mechanism. Some guns have a separate release lever that you must activate to stop the flow. If the problem persists, your gun may need cleaning or replacement of worn internal components.
How long should I wait before tooling the silicone caulk sealant?
Tool immediately after application for best results. Most products give you 5-15 minutes before they start to skin over and become difficult to tool smoothly. Environmental conditions affect timing – hot, dry weather reduces working time while cool, humid conditions extend it. When in doubt, tool sooner rather than later.
Can I use the same gun for different types of silicone caulk sealant?
Yes, but clean thoroughly between different products to prevent contamination and incompatibility issues. Remove all residue from the gun tip and cartridge holder. Some specialized products may require dedicated guns to prevent cross-contamination. For critical applications, consider having separate guns for different sealant types.
What should I do if I make a mistake during the application?
Clean up wet sealant immediately with appropriate solvents before it cures. For major mistakes, remove all sealant and start over – trying to patch over mistakes rarely works well. Small imperfections can often be fixed during tooling if you catch them quickly. Remember that proper surface preparation prevents most application problems.
Advanced Techniques for Professional Results
These techniques help achieve consistently professional results:
Consistent Bead Size
Practice maintaining steady speed and pressure for uniform appearance.
Use guide strips or templates for complex or repetitive work.
Mark your progress on long runs to maintain consistent spacing and sizing.
Coordinate with team members on large projects for seamless results.
Complex Joint Configurations
Plan your approach for corners, intersections, and transitions.
Use proper sequencing to ensure continuous seals without weak points.
Consider expansion joints for long runs or high-movement applications.
Coordinate with other sealant types where different products meet.
Quality Documentation
Photograph before, during, and after installation for quality records.
Record environmental conditions during application.
Document any deviations from standard procedures.
Maintain material certificates and batch numbers for traceability.
Заключение
Mastering how to use a silicone sealant gun properly transforms average DIY projects into professional-quality results. The key is understanding that consistent technique, proper preparation, and quality materials work together to create seals that last for decades.
Don’t rush the learning process – practice on scrap materials until your technique becomes smooth and automatic. The time invested in mastering these skills pays off through better results, fewer callbacks, and professional-looking work that builds your reputation.
Remember that your silicone caulk sealant is only as good as your application technique. Even premium materials fail when applied incorrectly, while proper technique can make standard products perform exceptionally well.
Start with simple projects to build confidence, then tackle more challenging applications as your skills develop. With practice and attention to detail, you’ll soon be creating perfect seals that protect buildings and satisfy customers for years to come.
Ready to tackle your sealing projects with confidence? BoPin Construction Chemicals offers professional-grade silicone caulk sealants and application support to help you achieve perfect results with every project.