Building penetrations for pipes, cables, and equipment represent the most vulnerable points in any waterproofing system – studies show 85-90% of building water leaks originate at penetrations rather than within continuous membrane areas. Every pipe, conduit, or structural element passing through roofs, walls, or foundations creates a pathway for water infiltration if not properly sealed.
Understanding penetration waterproofing principles and implementing systematic sealing strategies prevents costly water damage, protects building interiors, and maintains envelope integrity throughout building life. Whether you’re installing new mechanical systems, troubleshooting persistent leaks, or maintaining existing buildings, proper penetration sealing proves essential to long-term waterproofing success.
Understanding Penetration Waterproofing Challenges
Penetrations create waterproofing challenges that don’t exist in continuous building envelope areas. The fundamental problem – creating watertight seals around objects passing through waterproof barriers – requires understanding why penetrations leak and what makes effective sealing difficult.
Why Penetrations Are Vulnerable
Several factors make penetrations inherently challenging to waterproof effectively.
Discontinuity in waterproof membranes represents the primary challenge. Continuous membranes shed water reliably through unbroken surfaces, but every penetration interrupts that continuity creating potential water entry points. The junction between membrane and penetrating element becomes critical – water naturally seeks these interfaces.
Differential movement between buildings and penetrating elements stresses seals over time. Thermal expansion and contraction, building settlement, wind loading, and seismic movement create relative motion between pipes/cables and surrounding structure. Rigid connections crack under these movements, while inadequate flexible seals eventually fail from fatigue.
Installation complexity at penetrations exceeds that of continuous membrane application. Working around pipes and cables, creating proper geometry for sealants, accessing confined spaces, and coordinating multiple trades all increase likelihood of installation defects. Even small gaps or incomplete sealing creates leakage paths.
Multiple material interfaces concentrate at penetrations. Metal pipes, plastic conduits, concrete structures, waterproof membranes, and sealants all meet at single points. Each material has different thermal properties, surface characteristics, and compatibility requirements. Selecting products that adhere to all materials and accommodate their different behaviors challenges installers.
Inspection difficulty after installation means problems may go undetected until leaks occur. Unlike visible membrane defects, penetration sealing quality often becomes apparent only through water testing or actual service. By then, correction requires disruptive and expensive repairs.
Water Entry Mechanisms at Penetrations
Understanding how water enters through penetrations guides effective prevention strategies.
Direct infiltration through gaps represents the most obvious mechanism. Any opening between penetrating element and surrounding structure provides direct water pathway. Even small gaps accumulate substantial water entry over time, particularly under pressure or sustained exposure.
Capillary action draws water through very small gaps and cracks. Gaps as narrow as 0.1-0.2mm can transmit significant water through capillary suction, particularly on vertical surfaces or in partially filled gaps where capillary forces overcome gravity. This means seemingly tight fits without proper sealant still leak.
Interfacial failure occurs when sealants lose adhesion to substrates. Water migrates along the interface between sealant and pipe or structure, even when sealant itself remains intact. Poor surface preparation, incompatible materials, or inadequate primers cause adhesion loss allowing water bypass.
Membrane damage during penetration installation creates leakage paths. Cutting openings, working around penetrations, or mechanical damage from trades can compromise adjacent membrane areas. These defects may go unnoticed during penetration sealing but leak nonetheless.
Condensation on cold pipes passing through warm spaces can create apparent leaks. While not true waterproofing failure, condensation dripping from pipes or collecting at penetrations causes water damage. Proper insulation and vapor barriers prevent condensation being mistaken for leakage.
Types of Building Penetrations
Building penetrations vary widely in size, function, and waterproofing requirements. Categorizing penetration types helps select appropriate sealing strategies and materials.

Plumbing Penetrations
Plumbing systems create numerous envelope penetrations requiring waterproofing.
Water supply pipes penetrate walls and roofs to serve fixtures, equipment, and external connections. These pipes may range from 15mm residential water lines to 150mm+ commercial supply mains. Pressure systems require particularly reliable sealing as any leakage path allows water escape under system pressure.
Drain and vent pipes pass through roofs and walls serving waste systems. These penetrations often use larger diameter pipes (50-150mm) and may include multiple pipes grouped together. Proper pitch requirements for drainage mean these penetrations often occur at non-perpendicular angles complicating sealing.
Gas pipes require not only waterproofing but also gas-tight sealing preventing leakage in both directions. Special attention to material compatibility ensures sealants don’t degrade from gas exposure.
Condensate drains from HVAC equipment frequently penetrate walls and roofs. These small-diameter pipes (15-25mm) carry continuous water flow requiring reliable sealing preventing both inward leakage and outward spillage around penetration.
Electrical and Data Penetrations
Electrical systems create numerous small penetrations that collectively represent significant leakage potential.
Electrical conduits ranging from 15mm to 100mm+ diameter penetrate envelopes serving power distribution. Metal conduits offer different sealing considerations than PVC, requiring compatible products and different surface preparation.
Cable trays and raceways create large penetrations accommodating multiple cables. These penetrations challenge waterproofing due to their size and need for ongoing cable access. Mechanical sealing devices or flexible boots often work better than permanent sealants.
Low-voltage cables – data, telecommunications, security, fire alarm – create small but numerous penetrations. Individual cables may seem trivial but dozens passing through single area create substantial collective leakage path if not properly sealed.
Light fixtures recessed in exterior soffits or canopies require waterproof sealing around housings. These penetrations combine electrical requirements with waterproofing demanding compatible solutions.
HVAC and Mechanical Penetrations
Heating, ventilation, and air conditioning systems create some of the largest and most complex penetrations.
Ductwork penetrations for supply and return air can reach 600mm+ diameter. These large openings challenge waterproofing through their size alone. Additionally, duct systems may vibrate or move during operation requiring flexible sealing accommodating movement.
Refrigerant lines for split air conditioning systems create small bundled penetrations. The insulated copper lines (typically 6-19mm diameter) require sealing around both the pipes and insulation, creating multi-layer sealing challenges.
Exhaust vents from bathrooms, kitchens, and equipment rooms penetrate walls and roofs. These penetrations must seal against water while allowing air passage, requiring proper flashing and termination details beyond simple gap sealing.
Equipment bases for rooftop HVAC units create substantial penetrations accommodating mounting, refrigerant lines, condensate drains, and electrical connections. These complex multi-service penetrations require comprehensive sealing systems rather than simple approaches.
Structural and Miscellaneous Penetrations
Various other penetrations require waterproofing attention.
Equipment anchors for mounted items – solar panels, communication antennas, safety equipment – penetrate roofs and walls. Even small anchor bolts create potential leakage if not properly sealed with compatible materials.
joints de dilatation passing through waterproof layers require specialized treatment maintaining both movement capability and water resistance. These critical details often receive inadequate attention leading to premature failures.
Overflow drains and scuppers intentionally pass water through envelope but must prevent unintended infiltration. Proper flashing and sealing around these elements ensures controlled water passage without leakage.
Penetration Location Differences
Where penetrations occur dramatically affects waterproofing approach and difficulty. Roof, wall, and below-grade penetrations each create unique challenges requiring specific strategies.
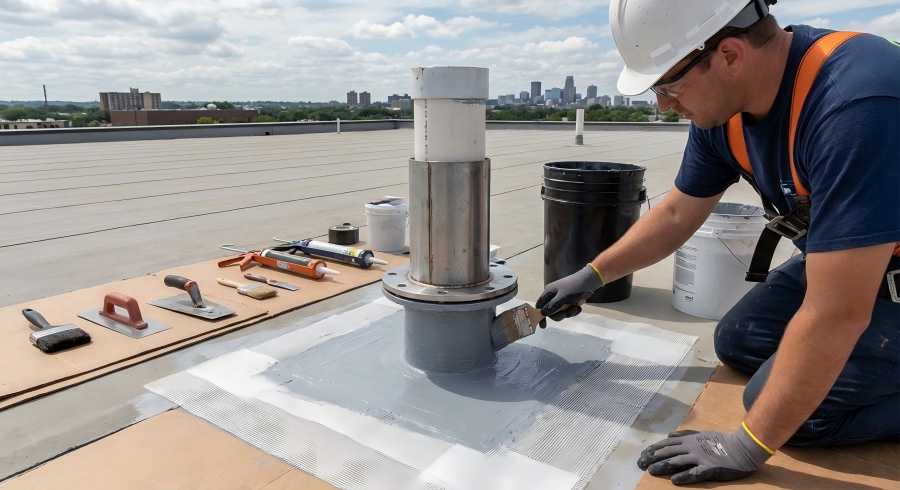
Roof Penetrations
Roof penetrations represent the most severe waterproofing challenge due to sustained water exposure and difficulty of access for repair.
Direct water exposure from rain, snow, and standing water constantly tests roof penetrations. Unlike vertical wall penetrations receiving intermittent exposure, roof penetrations face continuous water challenge during precipitation events. Ponded water creates hydrostatic pressure forcing water through any available gap.
UV and thermal extremes accelerate sealant aging on roofs. Exposed sealants must resist intense UV radiation and temperature cycling from sub-freezing to 70-80°C on dark surfaces in peak sun. Many sealants suitable for protected locations fail rapidly in roof exposure.
Difficult access after construction makes roof penetration repairs expensive and disruptive. Occupied buildings resist roof work due to interior disruption and operational interference. This makes initial proper execution critical – prevention proves far easier than cure.
Roof penetration best practices:
Raised curbs elevate penetrations above roof surface preventing water contact during ponding. Minimum 150-200mm curb height creates reliable protection even with inadequate roof drainage. Flashing integrated into curbs provides primary waterproofing layer with sealant serving as backup.
Pitch pans (also called pitch pockets) traditionally accommodated pipe penetrations through filled metal pans. However, modern practice avoids pitch pans as their numerous joints eventually leak. Proper flashing and sealing proves more reliable long-term.
Multiple seal layers provide redundancy for critical roof penetrations. Primary seal at membrane-pipe interface backed by secondary seal at curb or flashing ensures water doesn’t reach building interior even if primary seal eventually fails.
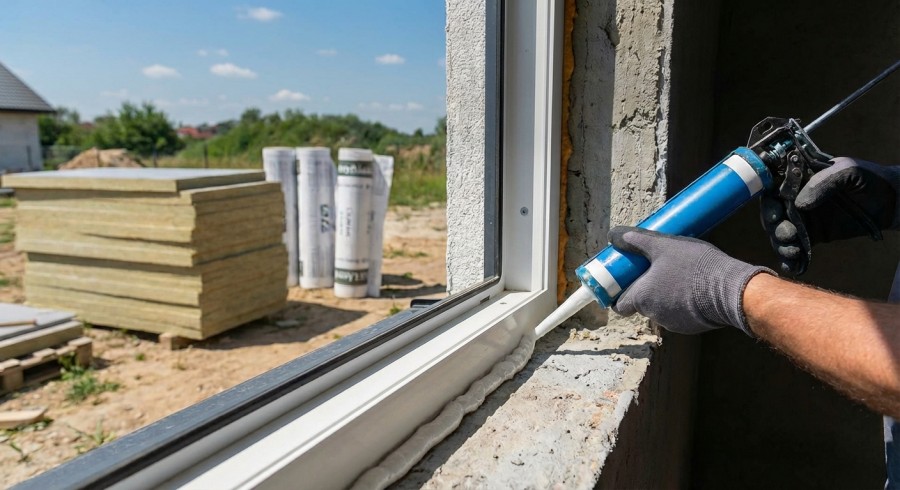
Wall Penetrations
Wall penetrations face different water exposure than roofs, primarily from wind-driven rain rather than standing water.
Intermittent exposure means wall penetrations wet and dry regularly rather than remaining submerged. This cycling challenges sealants differently than constant exposure – repeated wet/dry cycles test adhesion and flexibility through expansion/contraction.
Easier access for inspection and maintenance makes wall penetration defects less catastrophic than roof failures. Problems can be identified and corrected before major water intrusion damages building interiors.
Drainage considerations become critical for wall penetrations. Any water entering penetrations must drain outward rather than accumulating or flowing inward. Sloped seals, weep provisions, and proper flashing facilitate drainage.
Wall penetration strategies:
Sleeved penetrations with space between pipe and sleeve allow proper sealing depth and geometry. Flexible sealant in annular space accommodates both building and pipe movement. Sleeves also simplify future pipe replacement without disturbing waterproofing.
Exterior seals primary with interior seals backup provides layered defense. Weather-resistant sealants on exterior face water directly while interior seals catch any water bypassing exterior. This redundancy prevents interior water damage.
Slope away from building ensures any water reaching penetration runs outward. Slightly tilting pipes downward or providing drainage channels prevents water accumulation at penetration points.
Below-Grade Penetrations
Penetrations through basement walls or under-slab face sustained hydrostatic pressure requiring especially robust waterproofing.
Continuous water pressure from groundwater forces water through any available path. Unlike above-grade penetrations with intermittent exposure, below-grade penetrations face constant pressure requiring absolutely reliable sealing.
Difficult inspection and repair access makes below-grade failures particularly problematic. Once buildings are occupied and landscaping installed, accessing below-grade penetrations requires expensive excavation and interior disruption.
Hydrostatic pressure relief may be needed where high groundwater creates substantial pressure. Penetrations serving drains or designed for controlled water passage relieve pressure preventing it from seeking unintended paths.
Below-grade penetration requirements:
Waterstops at structural penetrations provide primary water barrier in concrete structures. Rubber or PVC waterstops cast into concrete create mechanical water barrier independent of sealants. Sealants then provide secondary backup at pipe-waterstop interface.
External waterproofing on outside of below-grade walls provides primary defense. Membrane waterproofing systems applied during construction seal penetrations before backfill. Internal sealing serves as backup for any external system failures.
Positive water cutoff rather than relying solely on sealant adhesion. Mechanical compression from waterstops or specialized penetration devices creates reliable seals even if adhesive bonds eventually fail.
Waterproofing System Design for Penetrations
Effective penetration waterproofing requires systematic design rather than relying on single products. Multi-layer defense with backup systems provides reliable long-term performance.
Primary and Secondary Seals
Redundant sealing layers provide crucial backup preventing water intrusion even when primary seals eventually fail.
Primary seals face water directly providing first line of defense. On roofs, primary seals typically involve flashing boots or membrane terminations at pipe perimeters. On walls, primary seals may be exterior sealant beads or flashing systems. Primary seals must use durable, weather-resistant materials appropriate for sustained exposure.
Secondary seals catch any water bypassing primary layer before it reaches interiors. Interior sealant beads, mechanical seals, or membrane patches serve as secondary barriers. While less exposed than primary seals, secondary seals remain critical as age and weather eventually compromise primary systems.
Drainage between seal layers prevents water accumulation if primary seal leaks. Small gaps or channels allowing outward drainage ensure water doesn’t pond between seals potentially overwhelming secondary barrier.

Sleeve and Annular Space Design
Proper sleeve design creates ideal geometry for sealant application and future maintenance.
Sleeve sizing should provide adequate annular space for sealant application. Minimum 25-40mm annular gap (12-20mm all around) allows proper sealant depth while preventing excessive sealant consumption. Larger pipes may require proportionally larger annular spaces.
Sleeve material selection affects sealant compatibility and installation ease. Metal sleeves (steel, copper) require compatible primers or mechanical anchors for reliable sealant adhesion. PVC sleeves typically bond well with most sealants without special preparation.
Sleeve placement through structure affects waterproofing difficulty. Centered placement with equal depth on both sides simplifies dual-seal installation. Flush mounting to exterior simplifies flashing integration but requires careful interior seal installation.
Backer rod installation in annular space provides proper sealant depth and prevents three-sided adhesion. Closed-cell polyethylene backer rod sized 25% larger than gap width compresses to proper fill level. Proper backer rod depth creates optimal width-to-depth ratio (typically 2:1) for sealant performance.
Flashing Integration
Proper flashing systems provide primary waterproofing with sealants serving backup roles.
Boot flashings for pipe penetrations shed water around pipes preventing water contact with sealant joints. Flexible EPDM or silicone boots accommodate thermal movement while maintaining waterproof barrier. Quality boots with stainless clamps provide decades of service when properly installed.
Sheet metal flashings custom-fitted around penetrations direct water away from vulnerable joints. Proper slope and lapping ensures water flows outward rather than accumulating. Sealant at flashing edges provides secondary backup rather than primary waterproofing.
Membrane terminations into split sleeves or termination bars create reliable connections between waterproof membranes and penetration sealing. Mechanical compression from termination bars enhances reliability beyond adhesive-only terminations.
Material Selection for Penetration Sealing
Selecting appropriate products for penetration waterproofing depends on exposure conditions, material compatibility, and movement requirements.
Polyurethane Foam Sealants
Polyurethane foam products excel at filling large irregular gaps around penetrations while providing both air sealing and insulation.
Expanding foam applications:
Large annular gaps – 40mm+ spaces around grouped pipes or oversized sleeves – benefit from foam filling. Products like BoPin PU-270 Low-Expansion Window & Door Foam fill substantial voids creating insulated, air-tight seals. Foam’s expansion allows complete gap filling even in irregular spaces difficult for other products.
Interior penetrations particularly benefit from foam sealing. HVAC and plumbing penetrations through interior walls or floors sealed with foam prevent air movement and sound transmission while blocking fire spread. Trimmed foam provides neat finished appearance painted to match surroundings.
However, foam limitations include:
- UV sensitivity – foam degrades rapidly in sunlight requiring protective coatings
- Not truly waterproof – foam absorbs water in sustained exposure
- Difficult to tool – foam requires trimming versus tooling smooth finishes
- Best used as backing for exterior sealant rather than sole seal
Proper foam application:
- Clean, dry gaps ensure adhesion
- Controlled application prevents over-expansion
- Trim excess after cure for neat appearance
- Coat or seal foam for exterior exposure with compatible sealants
Flexible Sealants for Waterproofing
High-performance flexible sealants provide durable waterproof seals accommodating movement at penetrations.
Silicone sealants offer excellent weather resistance, movement capability, and adhesion to diverse substrates. Neutral-cure silicones like BoPin 770 Weatherproof Neutral Silicone handle exterior exposure, extreme temperatures, and sustained UV without degradation. ±50% movement capability accommodates thermal expansion and building movement.
Silicone advantages for penetrations:
- Excellente résistance aux intempéries – decades of exterior service
- Wide temperature range – typically -40°C to +150°C
- Superior flexibility – ±50% movement accommodation
- stabilité aux UV – no degradation from sun exposure
- Good adhesion – bonds reliably to metals, masonry, most plastics
MS polymer sealants provide alternative flexibility with paintability. Products like BoPin MS-220 Multi-Purpose MS Polymer work well for interior penetrations or where color matching requires painting. While not quite matching silicone’s extreme weather resistance, MS polymers deliver excellent performance in most conditions.
Polyurethane sealants offer good flexibility and adhesion for many penetration applications. PU sealants generally cost less than silicones while delivering adequate performance for protected locations. However, UV sensitivity limits their use on exposed roof penetrations.
Application considerations:
- Proper joint geometry – 2:1 width-to-depth optimal
- Backer rod prevents three-sided adhesion and controls depth
- Surface preparation – clean, dry substrates ensure adhesion
- Priming when specified for difficult substrates
- Proper tooling creates optimal profile and substrate contact
Specialty Waterproofing Products
Certain penetration conditions benefit from specialized products.
Butyl rubber tapes provide instant waterproofing for emergency repairs or temporary sealing during construction. These self-adhering tapes conform to irregular shapes and provide immediate water barrier. However, UV sensitivity and limited long-term durability make them interim solutions rather than permanent fixes.
Hydrophobic foam tapes seal around penetrations while allowing expansion/contraction. Closed-cell foam tapes with waterproof facings compress to fill gaps accommodating movement. Pre-formed gaskets for standard pipe sizes simplify installation.
Liquid-applied waterproofing membranes coat complex penetration details creating seamless barriers. These brushable or sprayable products reach areas inaccessible to sheet materials or sealants. After curing, liquid membranes form durable, flexible waterproof coating.
Installation Procedures and Best Practices
Systematic installation procedures ensure penetration waterproofing performs as designed. Following proper sequences and techniques prevents the installation defects that cause most penetration failures.
Préparation de la surface
Proper surface preparation proves critical to reliable sealant adhesion and long-term performance.
Cleaning requirements vary by substrate and contamination type. New construction may have form oil, curing compounds, or construction debris requiring removal before sealing. Existing penetrations often accumulate dirt, biological growth, or old sealant residue needing thorough cleaning.
Mechanical cleaning – wire brushing, grinding, or sandblasting – removes stubborn contamination and creates sound bonding surfaces. For concrete or masonry, mechanical cleaning exposes sound material beneath surface degradation or laitance.
Solvent cleaning removes oils, greases, and chemical residues. Isopropyl alcohol or specialized cleaners like BoPin CL-900 Professional Cleaning Solution effectively clean without leaving residue. Allow complete solvent evaporation before sealant application.
Priming may be required for certain substrate combinations. Always follow manufacturer recommendations regarding which materials need primers. Proper primer application and adequate drying ensures optimal sealant bonding.

Installation Sequence
Proper sequence prevents errors and ensures all sealing layers function correctly.
For new construction penetrations:
- Install sleeves during structure construction providing proper annular space
- Apply primary waterproof membrane terminating into or around sleeves
- Install penetrating element (pipe, conduit, etc.) through sleeve
- Install flashing or boot as appropriate for location and penetration type
- Install backer rod in annular space at proper depth
- Apply sealant tooling to proper profile
- Install secondary interior seal if specified
- Inspect and test before covering or backfilling

For retrofit or repair penetrations:
- Remove failed sealing materials completely
- Clean all surfaces thoroughly removing contamination
- Evaluate and repair any structural damage or membrane defects
- Install new backer rod as needed
- Apply new sealant following manufacturer specifications
- Tool and finish creating proper profile
- Cure and test before returning to service
Application Technique
Proper sealant application technique affects both appearance and performance.
Perles continues without gaps or voids prevent water bypass. Gun speed, pressure, and nozzle size should create beads completely filling joints without excess that wastes material.
Tooling immediately after application while sealant remains workable. Proper tooling creates correct profile, ensures substrate contact, and produces smooth finish. For penetrations, concave profiles shed water better than flat or convex shapes.
Work in suitable conditions regarding temperature and moisture. Most sealants require substrate temperatures +5°C to +35°C for proper application and cure. High humidity accelerates moisture-cure products while very low humidity may slow cure problematically.
Special Considerations and Complex Situations
Certain penetration conditions create additional challenges requiring specialized approaches.
Fire-Rated Penetrations
Penetrations through fire-rated walls or floors must maintain fire resistance while providing waterproofing.
Fire-rated sealants and putties maintain fire barriers at penetrations. These specialized products resist fire penetration for rated periods (1-4 hours) while still providing water and air sealing. UL or FM certified systems ensure code compliance.
Firestop systems for large penetrations combine multiple materials – intumescent materials, mineral wool, specialized caulks – creating comprehensive fire and water barriers. Proper installation following certified system details ensures both fire and water resistance.
Conflicting requirements between fire protection and waterproofing sometimes arise. Consult fire protection engineers and waterproofing specialists coordinating requirements ensuring all needs are met without compromising either.
Vibrating Equipment Penetrations
Equipment generating vibration – pumps, compressors, large fans – create dynamic loads at penetrations.
Flexible connections between equipment and structure prevent vibration transmission while allowing necessary movement. These flexible elements require sealing that doesn’t restrict their movement or fail from flexing.
Oversized sleeves provide space for movement without contact between pipe and structure. Sealant in large annular gap must accommodate movement requiring products with maximum flexibility (±50%).
Regular inspection of vibrating equipment penetrations catches developing problems. Vibration accelerates sealant fatigue requiring more frequent maintenance than static penetrations.
Grouped and Bundled Penetrations
Multiple pipes or cables passing through single penetration challenge complete sealing.
Individual sealing around each element provides most reliable waterproofing but proves labor-intensive. When space allows, individual sleeves and seals ensure comprehensive protection.
Mechanical sealing devices like multi-cable transit systems accommodate numerous cables in single penetration. Modular inserts sized for specific cables compress against housing creating reliable seals for cable bundles.
Spray foam works well for complex grouped penetrations with irregular spacing. After foam cures and is trimmed, coating with flexible sealant provides durable weather barrier.
Temporary and Maintenance Access Penetrations
Penetrations requiring future access for maintenance or modifications need special consideration.
Removable seals using mechanical devices rather than permanent sealants simplify access. Spring-loaded or bolted compression seals can be loosened for access then resealed without reapplication.
Split boots with zippered or mechanical closures allow cable addition without disturbing permanent seals. These devices suit communication rooms or electrical spaces with frequent cable changes.
Documented procedures for maintenance access and resealing ensure waterproofing isn’t compromised. Include resealing requirements in maintenance plans preventing shortcuts that create leaks.
Problèmes courants et solutions
Understanding typical penetration waterproofing failures helps prevent problems and guides effective repairs.

Adhesion Failure
Sealant pulling away from substrate represents the most common penetration failure mode.
Causes :
- Inadequate surface preparation leaving contamination
- Incompatible materials or lack of required primer
- Movement exceeding sealant capability
- UV or chemical degradation weakening adhesion
Prévention:
- Thorough cleaning and proper surface preparation
- Use compatible primers when specified
- Select sealants with adequate movement capability
- Choose UV-stable products for exposed locations
Repair:
- Remove failed sealant completely
- Clean substrates thoroughly
- Apply primer if recommended
- Install new compatible sealant
Cohesive Failure
Sealant tearing internally indicates movement exceeded material capability or material degradation.
Causes :
- Joint movement exceeding sealant rating
- Improper joint sizing (too narrow or too deep)
- Material aging reducing flexibility
- Incorrect product selection for application
Prévention:
- Calculate expected movement and select appropriate sealant
- Design proper joint geometry
- Use premium products in demanding applications
- Replace aging sealants before failure
Repair:
- Widen joint if movement capacity insufficient
- Remove old material completely
- Install higher-movement-capability sealant
- Verify proper joint geometry with backer rod
Foam Penetration Behind Sealant
Water infiltrating behind sealant bead through poor adhesion or installation gaps.
Causes :
- Three-sided adhesion causing stress concentration
- Inadequate backer rod allowing sealant to bridge
- Installation gaps or voids in sealant bead
- Hydrostatic pressure forcing water behind sealant
Prévention:
- Always use proper backer rod
- Apply continuous sealant beads without gaps
- Tool sealant ensuring complete substrate contact
- Design for gravity drainage where possible
Repair:
- Remove sealant exposing penetration path
- Dry out structure before resealing
- Install proper backer rod
- Apply new sealant ensuring complete contact
Flashing or Boot Deterioration
Protective flashings or boots degrading exposes sealant joints to direct water or mechanical damage.
Causes :
- UV degradation of rubber or plastic materials
- Thermal cycling causing cracking
- Mechanical damage from foot traffic or maintenance
- Poor installation allowing water under flashings
Prévention:
- Select UV-resistant materials for exposed locations
- Install properly with adequate slope for drainage
- Protect vulnerable areas from traffic damage
- Regular inspection and maintenance
Repair:
- Replace deteriorated flashings or boots
- Verify underlying sealants remain intact
- Refresh sealant if exposed to water
- Consider upgrades to more durable products
Inspection and Maintenance
Regular inspection and proactive maintenance extend penetration waterproofing life while catching problems before serious damage occurs.
Inspection Frequency and Methods
Inspection frequency should reflect penetration exposure and criticality.
Roof penetrations warrant annual minimum inspection, preferably before and after rainy seasons. These critical areas face sustained water exposure making regular monitoring essential.
Wall penetrations can be inspected less frequently – every 2-3 years for most applications. However, areas with known problems or severe exposure benefit from annual inspection.
Below-grade penetrations present inspection challenges due to limited access. Inspect these during any excavation work even if unrelated to waterproofing. Interior moisture monitoring helps detect below-grade failures without excavation.
Inspection focus areas:
- Sealant adhesion – probe gently checking bond integrity
- Cracks or gaps – visual inspection identifying developing failures
- Material condition – assess degradation from UV, weathering, aging
- Flashing or boot condition – verify protective elements remain effective
- Water staining – evidence of past or ongoing leakage
- Surrounding structure – check for spalling, efflorescence, or damage
Maintenance Procedures
Proactive maintenance prevents failures and extends service life.
Cleaning removes dirt and biological growth that can trap moisture or degrade materials. Annual cleaning with gentle methods prevents abrasion damage while maintaining appearance and performance.
Sealant refresh in high-exposure areas before complete failure proves more economical than emergency repairs. After 10-15 years, proactively replacing sealants in critical locations prevents failure-related water damage.
Flashing and boot inspection should include checking mechanical attachments, verifying slope and drainage, and assessing material condition. Tightening loose clamps or adding sealant at flashing edges prevents developing problems.
Documentation of inspections and maintenance creates valuable records. Photos, notes on condition, and repair history help track deterioration and plan future maintenance.
Questions fréquemment posées
What’s the best sealant for waterproofing roof pipe penetrations?
For exposed roof penetrations, neutral-cure silicone sealants provide optimal performance through superior UV resistance, weather durability, and flexibility. Products offering ±50% movement capability and temperature resistance from -40°C to +150°C handle roof conditions reliably. Properly installed flashing boots provide primary waterproofing with sealant serving as backup seal – this layered approach proves more reliable than sealant alone. For best results, combine quality silicone sealant with durable EPDM or silicone boots creating redundant waterproofing layers.
How do I seal around pipes that are already installed and leaking?
For retrofit sealing of leaking penetrations, first identify and eliminate active water sources, then clean and dry all surfaces thoroughly before applying new sealant. Remove any old, failed sealant completely – leaving deteriorated material prevents new sealant from bonding. Clean surfaces with appropriate solvents removing dirt, oils, and biological growth. Allow complete drying – applying sealant over damp surfaces causes adhesion failure. Install backer rod in annular gap if space allows, then apply high-quality flexible sealant tooled to proper profile. For persistent leaks, consider adding flashing or boots providing additional protection beyond sealant alone.
Can I use expanding foam alone to waterproof penetrations?
Expanding polyurethane foam provides excellent air sealing and insulation but shouldn’t be used as sole waterproofing in sustained water exposure. Foam absorbs water when exposed to rain or standing water, and UV radiation rapidly degrades unprotected foam. For interior penetrations, foam works well providing air sealing, sound damping, and fire blocking. For exterior or roof penetrations, use foam as backing layer filling large gaps and providing insulation, then seal the exterior surface with weather-resistant flexible sealant. This combination leverages foam’s gap-filling ability while providing durable waterproof barrier.
How often should penetration seals be inspected and replaced?
Exposed roof penetrations require annual inspection minimum with sealant replacement every 10-15 years in demanding conditions, while protected wall penetrations can last 20+ years with less frequent inspection. Inspection frequency should increase for high-exposure locations – tropical climates with intense sun and rain, coastal environments with salt exposure, or industrial settings with chemical exposure. Look for cracking, adhesion loss, or material hardening indicating approaching failure. Proactive replacement before complete failure prevents water damage costing far more than preventive maintenance. Well-installed penetration sealing in protected locations may last decades requiring only periodic inspection rather than replacement.
What do I do if water leaks persist after sealing penetrations?
If leaks continue after sealing penetrations, verify the penetration is actually the water source – apparent penetration leaks sometimes originate elsewhere with water traveling to penetrations. Use water testing isolating specific areas to confirm leak location. If penetration is confirmed source, check for: inadequate surface preparation preventing adhesion, gaps or voids in sealant application, three-sided adhesion causing stress concentration, or movement exceeding sealant capability. Sometimes water bypasses visible sealing through hidden paths – gaps behind flanges, through threaded connections, or via damaged primary waterproofing. Consider adding secondary interior seals catching any water bypassing exterior sealing. For persistent difficult leaks, professional waterproofing inspection may identify overlooked issues.
Conclusion
Building penetrations for pipes, cables, and equipment represent the most vulnerable points in waterproofing systems, accounting for 85-90% of building leaks despite comprising small fractions of envelope area. The challenges – membrane discontinuity, differential movement, installation complexity, and multiple material interfaces – make penetration waterproofing demanding, but systematic approaches deliver reliable long-term performance.
Understanding penetration types and their specific requirements guides appropriate sealing strategies. Plumbing, electrical, and HVAC penetrations each create unique challenges regarding size, movement, accessibility, and exposure. Location dramatically affects approach – roof penetrations demand most robust solutions due to direct water exposure and difficult access, while wall penetrations benefit from easier maintenance and less severe conditions.
Effective waterproofing systems use layered defense rather than relying on single products. Primary seals face water directly while secondary backups catch any infiltration before it reaches interiors. Proper flashing systems combined with flexible sealants create redundancy ensuring even primary seal failure doesn’t cause building damage. Sleeve design creating proper annular space allows optimal sealant geometry and future maintenance access.
Material selection should match exposure conditions and performance requirements. Polyurethane foam excels at filling large irregular gaps while providing air sealing and insulation, but requires protective coatings for weather exposure. Silicone sealants deliver optimal performance for exposed locations through weather resistance, UV stability, and flexibility, while MS polymers offer paintability for protected applications. No single product handles all situations – comprehensive strategies use multiple materials systematically.
Proper installation procedures prove as critical as material selection. Thorough surface preparation, correct backer rod installation, proper joint geometry, and appropriate tooling ensure products perform as designed. Most penetration failures stem from installation defects rather than product inadequacy – rushing installation or skipping preparation compromises even premium materials.
Special situations – fire-rated penetrations, vibrating equipment, grouped pipes, or maintenance access penetrations – require additional consideration and specialized products. Understanding these unique requirements prevents compromises that create vulnerabilities.
Regular inspection and proactive maintenance extend waterproofing life while preventing small problems from becoming expensive failures. Annual roof penetration inspection with proactive sealant replacement after 10-15 years costs far less than emergency repairs and water damage restoration.
Whether installing new construction penetrations, troubleshooting persistent leaks, or maintaining existing buildings, systematic attention to penetration waterproofing protects buildings and prevents the costly water damage that makes penetration sealing among the most cost-effective investments in building durability.
Working on complex penetration waterproofing challenges or need expert guidance on material selection and installation specifications? Contact our technical team for professional support suited to your specific penetration types, exposure conditions, and performance requirements.
Related Articles: